Wednesday, March 23, 2011

The Shabby tea Room Week #54 Challenge


I thought I would play along with this weeks Shabby Tea Room design challenge. This week's challenge was to use any three in a row embellishments on the inspiration board posted on there site. I didn't play by the rules necessarily, instead I went for a diagonal trio; Brads, Flowers and Ribbon. Anyway, I think you can win at bingo on a diagonal or is that just tick-tack-toe?

Wednesday, March 16, 2011

Blog Giveaway; Celebrate the End of Winter

I know I am ready for Spring, but there are a few things about the winter that I will miss; cuddling under my heavy blankets, drinking warm cups of tea,  and watching the cardinals and the blue jays feed from our bird feeder. I guess what I am trying to get at is that if you truly find joy in the small things in life, then you can find pleasure in just about anything--even a dreadful winter season.


That's what inspired me when making these two pieces that I am offering up to my readers today, the memorable and fun moments of winter time. I realize Spring is only a few days away, but before we are officially out of winter let's make one more memory. And hopefully, by the time the next winter rolls around hopefully these little decorations will bring a bit of joy to your home as the cold weather moves in once again.


If you are already a follower of Vintage Haven Studio then all you need to do to enter my giveaway is to leave a comment on this post. I would love to hear how you are getting ready in your home for the Spring Season; wehther you are crafting, cooking or cleaning. For those of you who are new to this blog I would also love to hear your take on this, but I do have to ask that in order for you to qualify for the giveaway you will need to show support for my little ol' blog by becoming a follower. I would so very much appreciate your support in helping my little blog grow.

Make sure to spread the word by filling in a friend on the giveaway as well!


I will keep the giveaway open for two weeks and will pick two winners randomly on March 30th. The 1st winner will receive the Winter Wishes Wall Medallion and the 2nd winner will receive the Vintage Tag Garland.


Good luck and thank you so much for participating and showing your support!

Tuesday, March 15, 2011

Pretty Pink Cupcakes and My Day as a Guest Blogger

What an exciting day! I'm the guest blogger over at my friend Kathia's amazing baking blog
 Pink Little Cake. We thought it would be fun to bring her readers a post about making your own party decorations and favors, featuring some of my creations. Head on over to her blog for her recipe to make this fabulous pink icing.


I promise, I'll be back tomorrow with my first giveaway. I've created some adorable vintage inspired creations just for my readers. Hope to see you then! For now, I'm leaving you with a sneak peek of one of the goodies I'll be giving away.


Friday, March 11, 2011

Butterfly Fairy Wand Tutorial

Things are starting to settle down around here. My house and craft room are finally back in order, the kids are back on their schedules and I feel a bit more rested. Hopefully next week I'll get back to crafting some vintage inspired goodies and am still planning on putting together a tutorial featuring some of Claudine Hellmuth's mixed media art techniques--so looking forward to trying those out for myself.

In the meantime though, I put together a little tutorial on how to make your own Butterfly Fairy Wand for those special Fairy Princess's in your life.

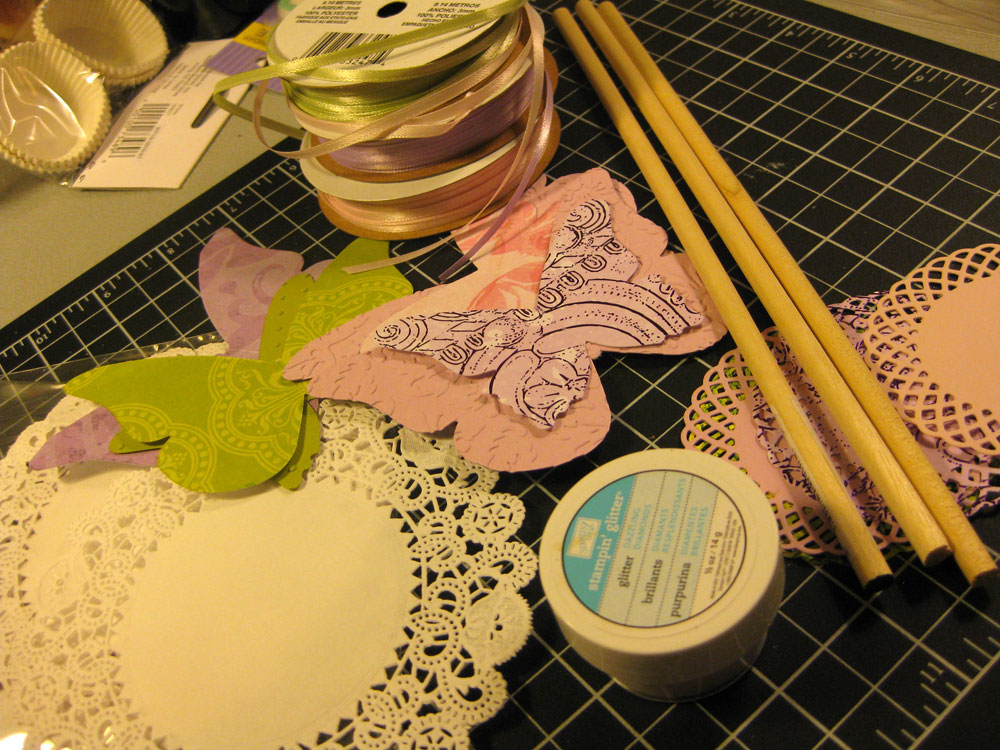
To make your own wand you will need to gather a few supplies; Paper dolie, ribbon, die cuts, card stock, a 10" wood dowel, score tape or other strong adhesive, paper cutter and a circle punch.

I started off by spraying a paper doilie with adhesive and then applying a fine glitter, because what good would a fairy wand be without a little sparkle?

My secret weapon for this project was score tape--love, love, love it! It's a super sticky tape and once something is adhered with it--it's not going anywhere!


To decorate the wooden dowel start off by cutting a piece of score tape (or other strong adhesive) just long enough to wrap around your the top of your dowel. Lay the tape down, sticky side up, and adhere three strands of thin ribbon on top.

Wrap the score tape around the top of your dowel, making sure that each piece of ribbon lays flat and facing down--that way there are no pieces of ribbon sticking out in awkward directions. Repeat this step to add ribbon to the bottom of the dowel as well.

Add a strip of score tape to both edges of a 9 1/2 inch by 1 1/4 inch cut piece of card stock.


Carefully roll the strip around the dowel, making sure to cover the bottom edge of the dowel, including the top of the ribbons with the card stock. Make sure to leave the top 1/2 inch of the dowel exposed, as it will be covered later anyway.


Layer your embellishments with score tape to the top of your sparkling doilie.


Cut a 2 1/2" circle from coordinating card stock and cover the circle with score tape.


Place the exposed top of the dowel on the circle  so that it sticks. Now position the dolie on top.

It's pretty simple and it's easy to make a bunch of these at the same time, especially if you have everything cut before you start to assemble.

Have fun bringing a little Fairy magic to someone specials life! I know I did.

Early next week I will be doing my very first GIVE AWAY! So make sure to stop by for your chance to win!


Tuesday, March 8, 2011

Plan Your Party With a Theme

When I first started thinking about what I wanted for my little girls first birthday party I had a few particular things in mind; my favorite girlie colors and butterflies. From there I let my imagination take over and I came up with the idea of a breath of spring, and from that inspiring idea my theme emerged. Baby girls birthday is actually in the middle of February, but even the day she was born was an exceptionally warm day for February. I remember thinking how she brought the Spring with her. And so for this years big first party I knew I wanted to incorporate those sweet elements of Spring into our party's decor to give our guests a real treat after our long and harsh Jersey winter.

Some sweet favors for all of our guests.


A few butterfly fairy wands for our special little girl guests.


Pin wheels for my son and all his rough and tumble buddies.


And some special paper bouquets for our table's center pieces.

Since we wanted to invite all of our friends and family and we knew we wouldn't be able to fit them into our cozy little home we had no other choice than to have the party at a local restaurant. Even still, with a few hand made decorations, a few bunches of colorful balloons from the party store and even some beautiful cupcakes to sit prettily on the cake table the restaurant's dinning room was made to have a very personal feeling. And of course filling it with people we love was the finishing touch!

A special thanks to my good friend Kathia who made us  those beautiful and delicious cupcakes. Unfortunately, I don't have the picture of them yet as I managed to snap one with my father's camera. Kathia has her very own blog and successful baking business, please make sure to take a look at her blog and leave her some warm words to make her day too; http://www.pinklittlecake.blogspot.com/

I'll be posting a tutorial sometime by the end of this week on how you can make your very own Butterfly fairy wand, so make sure to stop by again for that soon.

Monday, March 7, 2011

What a Week (or Two)

Where to begin---
At the start with a beautiful birthday girl celebrating her first Birthday?


Or at the end, the remains of a crafting frenzy in preparation for the big birthday party?


Or in the middle?


The flurry of blush, lavender and chartreuse.

The delicate embellishments --doilies, butterflies and glitter.


The subtle hint of springs sweet days.

Oh, thank heaven for little girls!

Happy Birthday Baby girl--the real reason for making this such a special day!

I'll be back tomorrow with pictures of all my finished projects from my little one's first Birthday party. Also, I'll be posting a fun tutorial by the end of this week.
Related Posts Plugin for WordPress, Blogger...